1. Introduction:
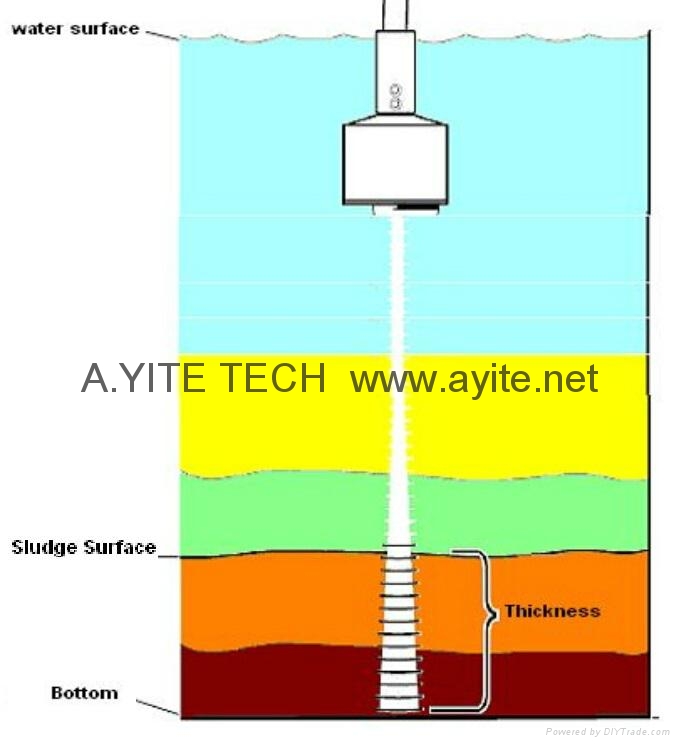
The GE-102 level meter is specially designed to measure the depth for sludge, it could be continual and online to monitor the sludge interface level in the sewage wastewater treatment field. This Sludge Level Meter could measure the position and height of sludge by the principle of ultrasonic echo, it will be real-time to monitor the thickness and depth of sludge, and to control the progress online. Then it could avoid the water quality deterioration and sludge denitrification or digestion.
* Level Range: 1m ~ 5m ~ 10m
* Accuracy: 1.0%
* Output: 4~20mA (Standard, 1~5V and RS485 is available)
* Power Supply: 220 VAC or 24V DC
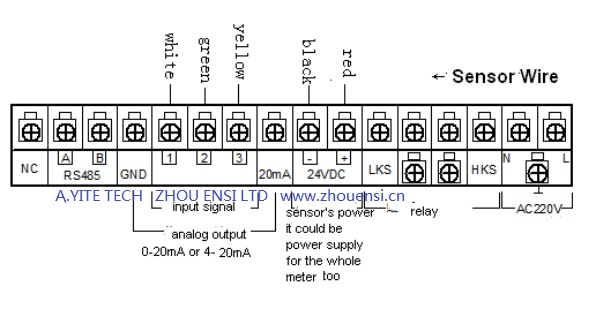
2. Wire Connection Diagram:

3. Key Function of Ultrasonic Level Controller:
[PAG] when the meter is working, press this key, it will display the page P1; then press Move Key, it will entry the parameter in P1; Press one time for Page Turn, it will go to next page one time.
[MOV] When set the parameter, press this key, move the changeable number. When finish set each number, press this key to each number again, then all number will flash, it means the parameter is set. When the display is close, press this key, the display will appear; when working, press this key 5 second, the backlight will close, press 5 second again, it will be open
[ADD] When set the parameter, press this key, the “flash number” will add 1; and it could confirm the point too. When need negative, pres this key, it will out minus, or change minus to plus; when working, press it 5 seconds, the display will close, then saving power; when working, press the key, it could change the display about “output analog” with “temperature”.
4. Parameter setting of Sludge Depth Level Meter:
Attention:
1. When measure, must power on 15 minutes before measure.
2. When measure the sea water, input the salinity value in P1, N
3. Avoid Noise and Electra-Magnetic Interference
4. Avoid high temperature and low temperature
5. Serial communication protocol RS-485 :
[Standard Baud Rate]
The system uses the asynchronous half-duplex communication, the baud rate could be 600~19200bps.
1. Master Meter: sent the address (1-64), then receive the data
2. Slave meter: Answer the master meter by stop, each frame sent 21 BYTE
The first 5 BYTE is water depth (5 BYTE ASC code, the unit is meter)
the BYTE 6~20 just for test in produce, no need pay attention
21st BYTE is Checksums
e.g. the below is a data sent by the meter
30 2E 35 30 31 31 31 33 2E 37 36 31 41 5C 2D 86 3F 00 4D B5 E6
----- water depth = 0.501m(30 2E 35 30 31) ;
----- 6~20 just for test in produce;
----- E6 is Checksums

1. When install the transducer, please consider the protection for transducer. Put the cable through the pipe at first, then connect the pipe with the transducer, avoid the force to the cable, then avoid the rending for the cable. if rupture the cable, the transducer will be destroyed.
2. To avoid the impact of water wave of the water surface, it will be better to install the transducer below the water surface by more than 0.5m.
Related Products:
GE-102 Sludge Depth Meter could measure the level position and height of sludge, 4-20mA + RS-485 output ..
Contact: Mr.Robert
Phone: 0086-13166369204
Tel: 400-852-8332
Email: hongkong@ayite.net
Add: Building 17 &22, No.2928, Chuan Zhou Highway, Shanghai, 201319, China